Quick Answer
Winterizing your lawn sprinkler system involves draining all water from pipes, valves, and sprinkler heads to prevent freeze damage. This process typically includes shutting off the water supply, draining the system using compressed air or manual methods, and insulating exposed components[1].
Key Takeaways
- Winterize before the first hard freeze (typically when temperatures drop below 28°F)
- Three main methods: compressed air blowout, manual drain, or automatic drain
- Shut off water supply and controller before starting the process
- Insulate backflow preventers and above-ground components
- Consider professional service for complex systems or if you lack proper equipment
Why Winterizing Your Sprinkler System Matters
Freezing water expands by approximately 9%, creating tremendous pressure that can crack pipes, damage valves, and destroy sprinkler heads[2]. Even small amounts of trapped water can cause expensive repairs come spring. Most irrigation system damage occurs when homeowners skip winterization or perform it incorrectly[3].
The investment in proper winterization—whether DIY or professional—typically costs far less than repairing freeze damage, which can run into hundreds or thousands of dollars depending on your system's complexity. While you're winterizing your irrigation, don't forget to also winterize your lawn mower and prepare your lawn for winter.
Step-by-Step Winterization Process
Method 1: Compressed Air Blowout (Most Effective)
This method requires an air compressor capable of producing 20-80 CFM depending on your system size[4].
- Turn off the water supply at the main shutoff valve
- Set controller to "rain" or "off" mode to prevent accidental activation
- Connect air compressor to the system's drain valve or test cock
- Activate each zone manually while applying compressed air (30-50 PSI for spray heads, 30 PSI for drip systems)
- Blow out each zone until only air comes from sprinkler heads (typically 2-5 minutes per zone)
- Disconnect air compressor and close all valves
Method 2: Manual Drain Method
If your system has manual drain valves at low points:
- Shut off water supply and controller
- Open all manual drain valves located at system low points
- Activate each sprinkler zone to help gravity drain remaining water
- Leave drain valves open throughout winter
Method 3: Automatic Drain System
Some newer systems include automatic drain valves that open when water pressure drops[5]:
- Turn off water supply
- Run each zone briefly to relieve pressure and activate automatic drains
- Verify all zones have drained by checking that sprinkler heads are empty
Protecting Above-Ground Components
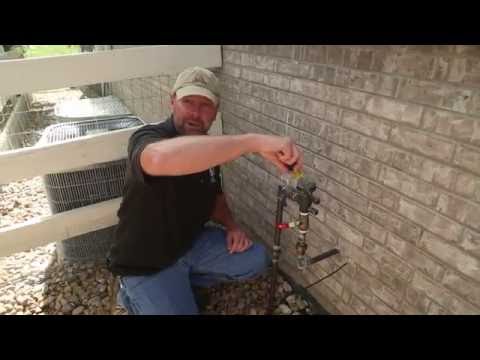
Backflow Preventer Care
Backflow preventers are particularly vulnerable since they're typically above ground[1]. After draining your system:
- Remove test cocks and relief valves if possible
- Wrap the unit in insulation or specialized covers
- Store removable parts indoors in a labeled bag
- Never use plastic bags directly against metal components (condensation risk)
Controller and Valve Box Winterization
- Switch controller to "off" or "rain" mode
- Install a rain sensor if you don't have one (prevents accidental activation during winter thaws)
- Ensure valve boxes have adequate drainage
- Check that valve box lids fit securely[6]
Timing and Regional Considerations
Winterization timing varies significantly by geographic location. In northern climates, complete winterization before nighttime temperatures consistently drop below 32°F[2]. Southern regions may only need partial winterization or protection of sensitive components.
Optimal timing by region:
- Northern states: Late September to early October
- Midwest: Mid to late October
- Southern regions: November to December (may only need backflow protection)
Monitor extended weather forecasts rather than calendar dates, as unseasonable temperature drops can catch homeowners unprepared[3].
When to Call a Professional
Consider professional winterization if:
- Your system lacks proper drain valves
- You don't own a sprinkler winterization kit or adequate air compressor
- The system includes complex zones with different pressure requirements
- You're uncomfortable working with compressed air equipment
- Previous DIY attempts resulted in incomplete drainage
Professional services typically cost $75-150 but include equipment, expertise, and often a service guarantee[4].
Preparing for Spring Startup
Before ending your winterization:
- Document any issues discovered during the process
- Note which sprinkler heads need adjustment or replacement
- Store removal parts (like backflow test cocks) in clearly labeled containers
- Schedule spring startup inspection to check for winter damage[5]
- Review our spring lawn watering schedule so your system is dialed in from day one
Conclusion
Proper sprinkler system winterization protects your irrigation investment and ensures reliable performance next growing season. Whether you choose compressed air blowout, manual draining, or professional service, the key is completing winterization before sustained freezing weather arrives. Start planning your winterization strategy now, gather necessary equipment or service contacts, and monitor weather forecasts for optimal timing. Your lawn and your wallet will thank you come spring.
Sources
- Colorado State University Extension - Irrigation system winterization and freeze protection guidelines
2. University of Nebraska-Lincoln Extension - Turfgrass irrigation management and seasonal maintenance
3. Rain Bird Corporation - Professional irrigation system maintenance and winterization research
4. Irrigation Association - Industry standards for irrigation system maintenance and winterization
5. Michigan State University Extension - Landscape irrigation system management and freeze protection
6. Consumer Reports - Home irrigation system maintenance and cost analysis